GIF animation during NST transaction
Using Python, GIF animations can be created with very short code. I tested it with plush toys.
The sample code is as follows. Created a folder named “input_image” in the same working folder and put frame-by-frame photos there, it is easy to create GIF animations. I also superimposed some “text” information on the images.
# import libraries
import glob
from PIL import Image, ImageFont, ImageDraw

# make the list of images and determine image size - photos must be placed in the folder/directory named "input_images"
pic_list = glob.glob("input_images/*.jpg")

# determine image size
img = Image.open(pic_list[0])
width, height = img.width // 10, img.height // 10

# text to superimpose
font_path   = 'From Cartoon Blocks.ttf'  # choose the text font (this is a free font downloaded and placed in the same folder)
font_size   = 45                         # font size
font_color  = (255, 255, 255)            # color = white
location    = (30, 20)
font = ImageFont.truetype(font_path, font_size)
insert_text = 'GIF TEST'

# Make GIF file and save it as the name "GIF_test.gif"
images = []
for i in range(len(pic_list)):
    img = Image.open(pic_list[i])
    img_resized = img.resize((width, height))

    img_draw = ImageDraw.Draw(img_resized)
    img_draw.text(location, insert_text, font = font, fill = font_color)

    images.append(img_resized)
    images[0].save('GIF_test.gif', save_all = True, append_images = images[1:], loop = 0, duration = 150)
Previously, I used Neural Style Transfer (NST) to make the cosmos flowers look like a watercolor painting, but if we save this learning process as image files at each time, we can see the change in GIF animation. Saving images can be done using the code "keras.preprocessing.image.save_img('location/filename', image_file)". That's it. After making a directory named “data” in the working folder, I put the following code in the Tensorflow official NST tutorial and performed it. (The official code is found HERE. Only 6 lines added to the original code: the parts from *** insert_X begin *** to *** insert_X end ***)
import time
start = time.time()
epochs = 30 # changed for GIF animation
steps_per_epoch = 50 # changed for GIF animation
# *************** insert_1 begin ***************
from tensorflow import keras
keras.preprocessing.image.save_img("data/content_image.png", np.squeeze(content_image)) # save the initial image in the "data" folder
result_prefix = 'water_color' # prefix to add the file name
# *************** insert_1 end ***************
step = 0
for n in range(epochs):
for m in range(steps_per_epoch):
step += 1
train_step(image)
print(".", end='', flush=True)
display.clear_output(wait=True)
display.display(tensor_to_image(image))
# *************** insert_2 begin ***************
iter_num = str(step).zfill(5)
file_name = "data/" + result_prefix + "_itern_" + iter_num + ".png"
keras.preprocessing.image.save_img(file_name, tensor_to_image(image))
# *************** insert_2 end ***************
print("Train step: {}".format(step))
end = time.time()
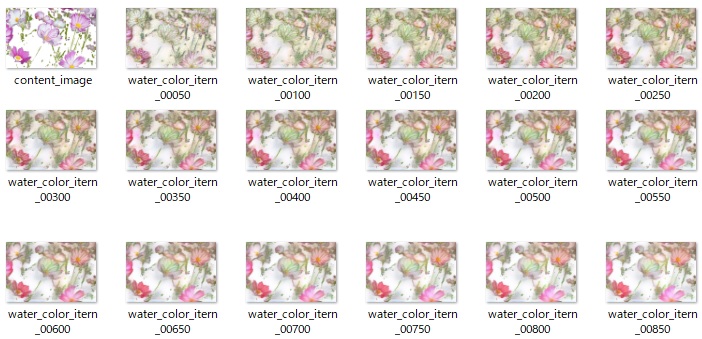
print("Total time: {:.1f}".format(end-start))Now images during NST transaction were made in the folder named "data" as shown below. The numbers in the file name mean steps in learning.
Then performed the following code block to combine them to a GIF file just like the plush toy example.
import glob
from PIL import Image

# make a list of created images
pic_list = glob.glob("data/*.PNG")
pic_num = len(pic_list)

# load the images and make a gif file
images = []
for i in range(pic_num):
    if i == 0:                          # 1 sec display for the content_image
        for j in range(1000):
            img = Image.open(pic_list[0])
            images.append(img)

    if i >= 1 and i <= pic_num - 2:    # make an animation of the image change
        img = Image.open(pic_list[i])
        images.append(img)

    if i == pic_num - 1 :               # 1 sec display for the final image
        for k in range(1000):
            img = Image.open(pic_list[pic_num - 1])
            images.append(img)

    # save the gif file
    images[0].save('water_color_pre_end.gif', save_all = True, append_images = images[1:], loop = 0, duration = 1)
The result: we can see that it has initially muddy and non-transparent colors, but changes to like a watercolor painting as it learns.